Go quick start
Ref
TODO
- select/defer/panic&recover
- Timer: Go 定时器实现
- 内存分配器/垃圾收集器/栈内存管理
- Json/HTTP/数据库等标准库
- 同步原语拓展部分 ErrGroup/Semaphore/SingleFlight
- 深入理解 GMP 模型、网络轮询器
- Go Lambda 变量逃逸
- nil and …args?
- sync.pool 原理
语法基础
for & range
for range 是 Go 中常用的范围遍历方法,在 Go 的实现中,会将 for range 转换为普通的 for 循环进行处理。
数组和切片,数组和切片可以通过 for range 进行遍历,可细分为三种不同的遍历,即是否使用 range 返回的 index 和 value。
arr := [...]int{1, 2, 3}
for range arr {}
for _ = range arr {}
for _, _ = range arr {}
在 for range 实现中,会先通过 len( ) 方法获取 arr 的长度,作为 for 的遍历次数,因此在 for range 中对 arr 进行修改不能够改变 for range 的遍历次数。如下示例所示。
arr := []int{1, 2, 3}
for range arr {
	arr = append(arr, 1)
}
fmt.Println("appended arr: ", arr)
并且,在 for range 中得到 value,不是 arr 中的 value,而是 Go 将 for range 转换为 for 之后,在 for 中拷贝了对应 arr 值的一个临时变量。观察以下代码输出,将发现 v 的地址不随 for 循环而改变,说明 v 指向的地址并不是 arr 中的变量所在内存。
for _, v := range arr {
		fmt.Println("v addr: ", &v)
}
因为上述原因,直接通过切片的方式在 for range 中删除元素将导致错误的预期结果。如以下代码所示,该代码不能够正确的删除 arr 中的所有元素,而将导致访问越界的错误。
for i := range arr {
	arr = append(arr[0:i], arr[i+1:]...)
	fmt.Println(arr)
}
正确的删除 for range 中的变量的做法是,使用临时内存将不需要删除的变量进行拷贝。
result := []int{}
for i := range arr {
	if arr[i] < 2 {
		result = append(result, arr[i])
	}
}
fmt.Println(result)

// 一种会改变 arr 顺序,但不需要额外内存空间的方法
j := 0
for i := range arr {
  if arr[i] >= 2 {
    arr[i] = arr[j]
    j++
  }
}
arr = arr[j:]
fmt.Println(arr)
- map、string、channel 的 for range 分析
select
defer
panic & recover
make & new
-
make 关键字返回 slice、hash、chan 等内置数据结构的结构体。
make([]int, 1, 5) // 参数分别为(初始化数据类型,长度,容量) -
new 只返回对应数据结构体大小的指针,并将指针指向的内存置零。
面向对象编程
interface & struct
interface 实现了一种抽象,使得模块之间通过接口进行通信,而不关注接口背后具体的实现。
在 Go 中,interface 分为 iface 和 eface 两种,interface 本质上是一种特殊的结构体。
- 其中 iface 是有方法的 interface,iface 结构体包含了接口类型和具体类型,数据指针等内容。
- 而 eface 是没有方法的、特殊的 interface,其结构体中仅包含具体类型和数据指针。
类型转换,类型转换是指实现了不同 interface 的变量转换为某一抽象的 interface 的过程。
-
如果变量是结构体指针,则转换后的 iface 和 eface 中的数据指针指向结构体指针对应的结构体内存。
-
而当变量是结构体,Go 首先将结构体进行拷贝,然后使 iface 和 eface 中的数据指针指向拷贝后的内存。
-
因此,对结构体转换而来的 interface,将 interface 通过类型断言转换为原类型变量后,与转换前的变量是不同的变量。如下代码所示,foo 与 foo2 是不同的变量,foo 不会因 foo2 的修改而发生改变。
type Foo struct {
	v int
}

var fooInter FooInterface = foo
foo2 := fooInter.(Foo)
foo2.v = 99
fmt.Println("convert struct to interface, copy happen, old foo still is", foo)
相同的,对 iface 而言,由结构体接收者实现的 interface 方法是不能够改变调用者结构体中的内部变量。由结构体指针接收者实现的 interface 方法能够改变调用者结构体中内部的变量,但是结构体初始化的变量不能够转换为该由结构体指针实现方法的 interface,因为结构体在转换为 iface 时将发生拷贝,此时 Go 不能够找到对应的结构体指针接收者。示例如下:
type FooInterface interface {
	hello()
}

type Foo struct {
	v int
}

func (f Foo) hello() {
	// can't modify f because the f is a struct instead of pointer
	f.v = 999
}

func interfaceExample() {
	println("interface example")
	foo := Foo{v: 1}
  // if hello() is func(f *Foo) hello(),
  // this convert is impossible.
	var fooInterface FooInterface = foo
	fooInterface.hello()
}
反射
反射是一种在运行时获取类型信息,并进行修改的方法。Go 中反射主要由 reflect.TypeOf 和 reflect.ValueOf 两个方法构成。TypeOf 能够获取变量的类型,ValueOf 能够获取变量的值,有了变量的类型和值,就能够实现对变量的所有操作。
TypeOf 方法返回一个 reflect.Type 的接口,而 ValueOf 方法返回一个 reflect.Value 的结构体。Type 接口定义了 Methods 等方法,用来获取类型拥有的方法、字段等,而 Value 定义了各种获取变量的值的方法。
通过反射调用变量的方法,改变变量的值如下代码所示:
type Foo struct {
	v int
  C int
}

func reflectExample() {
	println("reflect example")
	foo := Foo{v: 1}
	fooTyp := reflect.TypeOf(foo)
	nMethod := fooTyp.NumMethod()
	for i := 0; i < nMethod; i++ {
		fooTyp.Method(i).Func.Call([]reflect.Value{})
	}
	fooVal := reflect.ValueOf(&foo)
	fooVal.Elem().Field(1).SetInt(99)
	fmt.Printf("foo: %#v\\n", foo)
}
- 补充 TypeOf/ValueOf 等方法源码分析
标准容器
数组
数组是只能存储固定数量相同类型数据的数据结构。
arr := [3]int{1,2,3}
arr2 := [...]int{1,2,3}
slice
切片是一种动态数组,其容量能够动态调整。
slice := []int{1,2,3}
slice2 := make([]int, 3)
slice3 := arr[0:3]
slice4 := arr[0:3:3]
切片也能够从数组中创建,此时需要注意的是切片是底层数组的一个部分引用,对切片的修改也会同步影响对底层数组的修改,需要注意的是,当切片发生扩容时,可能会切换底层数组,即切片失去与原数组的关联。
arr := [3]int{1,2,3}
slice3 := arr[0:3]

func sliceExample() {
	println("slice example")
	arr := [3]int{1, 2, 3}
	slice := arr[0:3]
	slice[1] = 9
	fmt.Println("arr: ", arr)
	slice = append(slice, 4)
	fmt.Println("slice: ", slice)
	fmt.Println("arr: ", arr)
}
map
map 是一种键值对映射的数据结构,利用 hash 函数将 key 映射到数组中的索引上,当发生碰撞上采用开放寻址法或拉链法避免冲突,hash 表需要考虑装载因子,装载因子指元素总量和数组容量的比例,因为装载因子越大,则 hash 表的性能越差,合适的装载因子能够充分利用数组容量,而不导致 hash 表的性能急剧下降。
map 的初始化方式包括以下两种:
hash := map[string]int{}
hash2 := make(map[string]int, 0)
map 的读写操作如下:
hash["key"] = 1
value := hash["key"]
value2, ok := hash["key"]
for k, v := range hash {
  println(k, v)
}
delete(hash, "key")
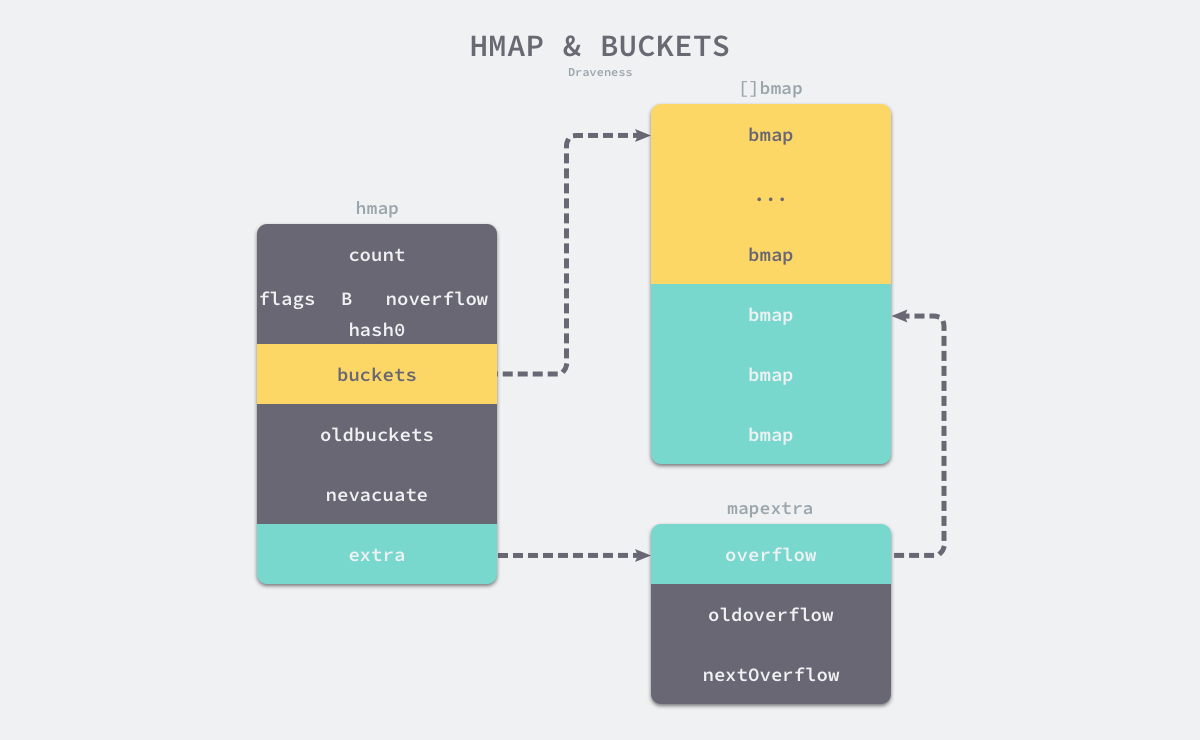
map 的数据结构如下图所示,map 由 hmap 表示,hmap 持有的 buckets 数组由 $[ ]bmap$ 表示,一般情况下,一个 bmap 结构体中存放 8 个键值对。同时,hmap 还持 overflow 数据结构,overflow 作为溢出桶减少扩容的次数(下图中 buckets 与 overflow 的数量比为 1:1 并不具有适用性)。
除了 bukets/overflow 此外,hmap 还持有 oldbuckets/oldoverflow,其作为扩容的中间状态而存在。
-
map 扩容,当超过负载因子或者溢出桶过多时,会在向 map 赋值时触发 hashGrow() 进行扩容。扩容首先会将当前 buckets/overflow 设置为 oldbuckets/oldoverflow,然后进行渐进式的扩容,每次对 map 进行操作时,会通过 oldbuckets 是否为 nil 判断当前是否在进行扩容。
if !h.growing() && (overLoadFactor(h.count+1, h.B) || tooManyOverflowBuckets(h.noverflow, h.B)) {
  hashGrow(t, h)
  goto again // Growing the table invalidates everything, so try again
}

func overLoadFactor(count int, B uint8) bool {
	return count > bucketCnt && uintptr(count) > loadFactorNum*(bucketShift(B)/loadFactorDen)
}

func tooManyOverflowBuckets(noverflow uint16, B uint8) bool {
	// If the threshold is too low, we do extraneous work.
	// If the threshold is too high, maps that grow and shrink can hold on to lots of unused memory.
	// "too many" means (approximately) as many overflow buckets as regular buckets.
	// See incrnoverflow for more details.
	if B > 15 {
		B = 15
	}
	// The compiler doesn't see here that B < 16; mask B to generate shorter shift code.
	return noverflow >= uint16(1)<<(B&15)
}
当发现目前在进行扩容时,会调用 evacuate( ) 函数执行数据迁移过程,该函数会将对 map 操作的 bucket 迁移到新的 buckets 中,同时还会根据 nevacuate 计数器,对计数器所指示的 oldbuckets 执行数据迁移。
func growWork(t *maptype, h *hmap, bucket uintptr) { // make sure we evacuate the oldbucket corresponding // to the bucket we're about to use evacuate(t, h, bucket&h.oldbucketmask()) // evacuate one more oldbucket to make progress on growing if h.growing() { evacuate(t, h, h.nevacuate) } } -
map hash 中取余技巧:
// bucketShift returns 1<<b, optimized for code generation.
func bucketShift(b uint8) uintptr {
	// Masking the shift amount allows overflow checks to be elided.
	return uintptr(1) << (b & (goarch.PtrSize*8 - 1))
}

// bucketMask returns 1<<b - 1, optimized for code generation.
func bucketMask(b uint8) uintptr {
	return bucketShift(b) - 1
}

bucket := hash & bucketMask(h.B)
b := (*bmap)(add(h.buckets, bucket*uintptr(t.BucketSize)))
第 12 行代码中的 $h.B$ 为 2 的指数,map 存放简直对的 bucket 数组的长度为 $2^{h.B}$,第 12 行代码即实现了对 hash 值的取余,相当于下面代码:
// bucket := hash & ((1 << h.B) - 1))
bucket := hash % math.Pow(2, h.B)
原理是当取余的数字是 2 的指数大小时,hash 按二进制看,其位数大于指数 h.B 的部分一定能够被指数 h.B 整除,而小于指数 h.B 的部分就是余数,通过同 $((1 << h.B) - 1))$ 相与,就能够得到取余的部分。
List
List 是一个双向链表。使用 List 结构体存储头节点和链表长度。
// List represents a doubly linked list.
// The zero value for List is an empty list ready to use.
type List struct {
 root Element // sentinel list element, only &root, root.prev, and root.next are used
 len  int     // current list length excluding (this) sentinel element
}
节点为 Element 元素。包括前后指针,和指向所属的 list 的指针,使用 any 存储任意值。
// Element is an element of a linked list.
type Element struct {
 // Next and previous pointers in the doubly-linked list of elements.
 // To simplify the implementation, internally a list l is implemented
 // as a ring, such that &l.root is both the next element of the last
 // list element (l.Back()) and the previous element of the first list
 // element (l.Front()).
 next, prev *Element

 // The list to which this element belongs.
 list *List

 // The value stored with this element.
 Value any
}
内部实现 insert/remove/move 等基本 API 操作,衍生出公开的诸如 InsertBefore() 等 API。
insert() 实现如下,首先确定插入节点 e 的前后指针,接着更新 e 的前后节点的 next 和 prev 指针。此外赋值所属 list 指针和增加 list 表示长度。
// insert inserts e after at, increments l.len, and returns e.
func (l *List) insert(e, at *Element) *Element {
 e.prev = at
 e.next = at.next
 e.prev.next = e
 e.next.prev = e
 e.list = l
 l.len++
 return e
}
remove() 实现如下,更新前后节点的 next 和 prev 指针,然后释放当前节点的引用。
// remove removes e from its list, decrements l.len
func (l *List) remove(e *Element) {
 e.prev.next = e.next
 e.next.prev = e.prev
 e.next = nil // avoid memory leaks
 e.prev = nil // avoid memory leaks
 e.list = nil
 l.len--
}
move() 的实现如下,首先判断是否需要移动,接着更新当前节点的前后节点指针,进行删除,最后更新插入位置的指针和插入位置前后节点的指针。
// move moves e to next to at.
func (l *List) move(e, at *Element) {
 if e == at {
  return
 }
 e.prev.next = e.next
 e.next.prev = e.prev

 e.prev = at
 e.next = at.next
 e.prev.next = e
 e.next.prev = e
}
Ring
是一个环形链表。环中的每一个元素由 Ring 构成。Ring 的组成如下。
// A Ring is an element of a circular list, or ring.
// Rings do not have a beginning or end; a pointer to any ring element
// serves as reference to the entire ring. Empty rings are represented
// as nil Ring pointers. The zero value for a Ring is a one-element
// ring with a nil Value.
type Ring struct {
 next, prev *Ring
 Value      any // for use by client; untouched by this library
}
Ring 主要包括三类操作,1)、New() / Link() / Unlink() 等初始化及链接和断开环的操作。2)、Next() / Prev() / Move() 等移动节点的操作。3)、Do() 遍历环中节点的操作。
New() 用来初始化环,New() 主要逻辑如下,首先判断长度是否大于零,然后初始化一个 Ring 指针,然后根据长度增加节点,最后链接头尾节点。
// New creates a ring of n elements.
func New(n int) *Ring {
 if n <= 0 {
  return nil
 }
 r := new(Ring)
 p := r
 for i := 1; i < n; i++ {
  p.next = &Ring{prev: p}
  p = p.next
 }
 p.next = r
 r.prev = p
 return r
}
Link() 用于链接两个环,Link() 的实现如下,源码中强调了不能使用多重赋值,是因为多重赋值是不能保证赋值顺序的,而这里我们需要强调赋值的顺序。
首先获取当前节点 r 的下一个节点及目标节点 s 的最后一个节点,在节点 s 的头部进行链接,即 r.next = s 和 s.prev = r,接着在节点 s 的尾部进行链接,即 p.next() = n 和 n.prev = p。
如果 r 和 s 是同一个环中的节点,那么 r 和 s 中间的节点将会移除,r 和 s 链接在一起,剩下的部分链接在一起。
func (r *Ring) Link(s *Ring) *Ring {
 n := r.Next()
 if s != nil {
  p := s.Prev()
  // Note: Cannot use multiple assignment because
  // evaluation order of LHS is not specified.
  r.next = s
  s.prev = r
  n.prev = p
  p.next = n
 }
 return n
}
Next() / Move() / Prev() 逻辑相近,其实现如下。
其中 if r.next == nil 的判断可能是用户自己初始化的 Ring 结构体没有成环的检查 🤔️。
// Next returns the next ring element. r must not be empty.
func (r *Ring) Next() *Ring {
 if r.next == nil {
  return r.init()
 }
 return r.next
}

// Prev returns the previous ring element. r must not be empty.
func (r *Ring) Prev() *Ring {
 if r.next == nil {
  return r.init()
 }
 return r.prev
}

// Move moves n % r.Len() elements backward (n < 0) or forward (n >= 0)
// in the ring and returns that ring element. r must not be empty.
func (r *Ring) Move(n int) *Ring {
 if r.next == nil {
  return r.init()
 }
 switch {
 case n < 0:
  for ; n < 0; n++ {
   r = r.prev
  }
 case n > 0:
  for ; n > 0; n-- {
   r = r.next
  }
 }
 return r
}
Do() 函数逻辑即遍历环,并对每个节点应用 f()。这种设计模式有一定的局限,如果 Do 能够传入可变参数列表,并将可变参数列表传入 f 中,这样可以将外部变量代入处理函数 f 中,这样在某些统计函数时带来便利性,如 Do(f(len), len) 这种模式。
// Do calls function f on each element of the ring, in forward order.
// The behavior of Do is undefined if f changes *r.
func (r *Ring) Do(f func(any)) {
 if r != nil {
  f(r.Value)
  for p := r.Next(); p != r; p = p.next {
   f(p.Value)
  }
 }
}
相比于 List 的双向链表,Ring 是有限制的双向链表,Ring 有以下特点。
- 无法在 O(1) 时间复杂度内确定环的长度。
- 不能直接调用 Insert、Remove 等传统链表操作。
Heap
container/heap
实现了堆的数据结构,这里采用 interface 的模式描述堆的特性,并不直接实现堆的容器。
type Interface interface {
 sort.Interface
 Push(x any) // add x as element Len()
 Pop() any   // remove and return element Len() - 1.
}

type Interface interface {
	Len() int
	Less(i, j int) bool
	Swap(i, j int)
}
Heap 的核心方法为 up() / down(),在《算法》一书中为 swim() / sink(),意为上浮和下沉。
up() 的实现如下,首先 i := (j - 1) / 2 找到对应节点的父节点,这里是从 0 开始计算节点,接着判断节点是否为堆顶,判断是否需要进行交换,不满足条件退出循环,否则,交换父节点于子节点,并对父节点迭代操作。
func up(h Interface, j int) {
 for {
  i := (j - 1) / 2 // parent
  if i == j || !h.Less(j, i) {
   break
  }
  h.Swap(i, j)
  j = i
 }
}
down() 的实现如下,首先用 j1 := 2*i + 1计算对应子节点的索引,这里从 0 开始计算节点,并判断该索引是否超出长度 n,此外源码这里考虑到了可能溢出的问题,判断 j1 < 0。
接着判断子节点中左节点和右节点的大小,选取更小者,最后判断更小者与父节点的大小关系,如果不满足交换则退出,否则交换子节点和父节点,并对子节点进行迭代。
最后返回结果时,根据初始索引和最后的索引值判断是否能够下沉。
func down(h Interface, i0, n int) bool {
 i := i0
 for {
  j1 := 2*i + 1
  if j1 >= n || j1 < 0 { // j1 < 0 after int overflow
   break
  }
  j := j1 // left child
  if j2 := j1 + 1; j2 < n && h.Less(j2, j1) {
   j = j2 // = 2*i + 2  // right child
  }
  if !h.Less(j, i) {
   break
  }
  h.Swap(i, j)
  i = j
 }
 return i > i0
}
Heap 根据 up() / down() 方法实现了其他暴露出来的 API。
Init() 方法对堆进行初始化,Push() / Pop() 方法分别实现向堆中有序加入元素和弹出堆顶的操作,这两个操作依赖于 Interface 中实现的 Push 和 Pop。Remove() 方法将目标索引替换至队尾并重新有序化堆,最后调用 interface 中的 Pop 实现删除目标索引的元素。Fix() 方法用于堆指定元素重新有序化,这可以运用于直接修改堆中指定索引的元素后,调用 Fix 方法保证堆的有序化。
func Init(h Interface) {
 // heapify
 n := h.Len()
 for i := n/2 - 1; i >= 0; i-- {
  down(h, i, n)
 }
}

func Push(h Interface, x any) {
	h.Push(x)
	up(h, h.Len()-1)
}

func Pop(h Interface) any {
	n := h.Len() - 1
	h.Swap(0, n)
	down(h, 0, n)
	return h.Pop()
}

func Remove(h Interface, i int) any {
	n := h.Len() - 1
	if n != i {
		h.Swap(i, n)
		if !down(h, i, n) {
			up(h, i)
		}
	}
	return h.Pop()
}

func Fix(h Interface, i int) {
	if !down(h, i, h.Len()) {
		up(h, i)
	}
}
并发编程
Channel
CSP(Communicating Sequential Processes) 顺序通信进程是一种并发编程模型,goroutine 和 channel 分别是 CSP 中的实体和消息媒介。
channel 的数据结构如下所示,在 Go 中由 hchan 数据结构所表示。
type hchan struct {
	qcount   uint           // total data in the queue
	dataqsiz uint           // size of the circular queue
	buf      unsafe.Pointer // points to an array of dataqsiz elements
	elemsize uint16
	closed   uint32
	elemtype *_type // element type
	sendx    uint   // send index
	recvx    uint   // receive index
	recvq    waitq  // list of recv waiters
	sendq    waitq  // list of send waiters

	// lock protects all fields in hchan, as well as several
	// fields in sudogs blocked on this channel.
	//
	// Do not change another G's status while holding this lock
	// (in particular, do not ready a G), as this can deadlock
	// with stack shrinking.
	lock mutex
}
buf 是 channel 中的缓冲区,sendx 与 recvx 分别表示发送端和接受端在 buf 中所在的位置。channel 的缓冲区即一个由数组模拟的环形缓冲区。
recvq 和 sendq 分别表示 channel 上接收者和发送者的等待队列,当 channel 中的缓存区为空(满)时,接收者(发送者)将阻塞,channel 将阻塞的 goroutine 加入到 waitq 链表中进行管理。
简而言之,Channel 是一个由环形缓冲数组、消费者队列、生产者队列组成的通信结构。
当向 channel 发送数据时,分为以下三种情况:
- 当 channel 的 recvq 等待队列中存在接收者时,直接通过 DirectSend 方法将发送的消息复制到 a := <- ch 中的变量 a 中,同时唤醒对应的接收者 goroutine,将其加入到 runnext 队列中,在下次调度时运行 goroutine。
- 当 channel 的缓冲区不为空时,将发送消息拷贝到缓冲区中。
- 当 channel 的缓冲区满时,将发送者加入到 sendq 等待队列中,并阻塞当前的 goroutine,等待接收者接收消息后唤醒。
当从 channel 中读取数据时,与向 channel 中发送数据相同,分为三种情况:
- 当 channel 的 sendq 等待队列中存在发送者时且缓冲区中存在数据,则从缓冲区中获取数据,并唤醒 sendq 等待队列中的一个发送者,将数据追加到缓冲区中。如果缓冲区中没有数据,则直接将发送消息复制到对应的接收变量中。
- 当 channel 的缓冲区不为空时,直接获取缓冲区中的数据。
- 当 channel 为空时,将当前 goroutine 添加到 recvq 等待队列中,然后阻塞当前 goroutine。
channel 主要涉及创建、发送和接收三个操作:
-
func makechan(t *chantype, size int) *hchan {}
首先计算创建 channel 需要的内存大小,接着根据内存大小、存储的内容是否包括指针选择申请内存的方式,最后初始化相关变量后返回
*hchanfunc makechan(t *chantype, size int) *hchan { elem := t.elem // compiler checks this but be safe. if elem.size >= 1<<16 { throw("makechan: invalid channel element type") } if hchanSize%maxAlign != 0 || elem.align > maxAlign { throw("makechan: bad alignment") } mem, overflow := math.MulUintptr(elem.size, uintptr(size)) if overflow || mem > maxAlloc-hchanSize || size < 0 { panic(plainError("makechan: size out of range")) } // Hchan does not contain pointers interesting for GC when elements stored in buf do not contain pointers. // buf points into the same allocation, elemtype is persistent. // SudoG's are referenced from their owning thread so they can't be collected. // TODO(dvyukov,rlh): Rethink when collector can move allocated objects. var c *hchan switch { case mem == 0: // Queue or element size is zero. c = (*hchan)(mallocgc(hchanSize, nil, true)) // Race detector uses this location for synchronization. c.buf = c.raceaddr() case elem.ptrdata == 0: // Elements do not contain pointers. // Allocate hchan and buf in one call. c = (*hchan)(mallocgc(hchanSize+mem, nil, true)) c.buf = add(unsafe.Pointer(c), hchanSize) default: // Elements contain pointers. c = new(hchan) c.buf = mallocgc(mem, elem, true) } c.elemsize = uint16(elem.size) c.elemtype = elem c.dataqsiz = uint(size) lockInit(&c.lock, lockRankHchan) if debugChan { print("makechan: chan=", c, "; elemsize=", elem.size, "; dataqsiz=", size, "\n") } return c } -
func chansend(c *hchan, ep unsafe.Pointer, block bool, callerpc uintptr) bool {}
func chansend(c *hchan, ep unsafe.Pointer, block bool, callerpc uintptr) bool { if c == nil { if !block { return false } gopark(nil, nil, waitReasonChanSendNilChan, traceEvGoStop, 2) throw("unreachable") } if debugChan { print("chansend: chan=", c, "\n") } if raceenabled { racereadpc(c.raceaddr(), callerpc, abi.FuncPCABIInternal(chansend)) } // Fast path: check for failed non-blocking operation without acquiring the lock. // // After observing that the channel is not closed, we observe that the channel is // not ready for sending. Each of these observations is a single word-sized read // (first c.closed and second full()). // Because a closed channel cannot transition from 'ready for sending' to // 'not ready for sending', even if the channel is closed between the two observations, // they imply a moment between the two when the channel was both not yet closed // and not ready for sending. We behave as if we observed the channel at that moment, // and report that the send cannot proceed. // // It is okay if the reads are reordered here: if we observe that the channel is not // ready for sending and then observe that it is not closed, that implies that the // channel wasn't closed during the first observation. However, nothing here // guarantees forward progress. We rely on the side effects of lock release in // chanrecv() and closechan() to update this thread's view of c.closed and full(). if !block && c.closed == 0 && full(c) { return false } var t0 int64 if blockprofilerate > 0 { t0 = cputicks() } lock(&c.lock) if c.closed != 0 { unlock(&c.lock) panic(plainError("send on closed channel")) } if sg := c.recvq.dequeue(); sg != nil { // Found a waiting receiver. We pass the value we want to send // directly to the receiver, bypassing the channel buffer (if any). send(c, sg, ep, func() { unlock(&c.lock) }, 3) return true } if c.qcount < c.dataqsiz { // Space is available in the channel buffer. Enqueue the element to send. qp := chanbuf(c, c.sendx) if raceenabled { racenotify(c, c.sendx, nil) } typedmemmove(c.elemtype, qp, ep) c.sendx++ if c.sendx == c.dataqsiz { c.sendx = 0 } c.qcount++ unlock(&c.lock) return true } if !block { unlock(&c.lock) return false } // Block on the channel. Some receiver will complete our operation for us. gp := getg() mysg := acquireSudog() mysg.releasetime = 0 if t0 != 0 { mysg.releasetime = -1 } // No stack splits between assigning elem and enqueuing mysg // on gp.waiting where copystack can find it. mysg.elem = ep mysg.waitlink = nil mysg.g = gp mysg.isSelect = false mysg.c = c gp.waiting = mysg gp.param = nil c.sendq.enqueue(mysg) // Signal to anyone trying to shrink our stack that we're about // to park on a channel. The window between when this G's status // changes and when we set gp.activeStackChans is not safe for // stack shrinking. gp.parkingOnChan.Store(true) gopark(chanparkcommit, unsafe.Pointer(&c.lock), waitReasonChanSend, traceEvGoBlockSend, 2) // Ensure the value being sent is kept alive until the // receiver copies it out. The sudog has a pointer to the // stack object, but sudogs aren't considered as roots of the // stack tracer. KeepAlive(ep) // someone woke us up. if mysg != gp.waiting { throw("G waiting list is corrupted") } gp.waiting = nil gp.activeStackChans = false closed := !mysg.success gp.param = nil if mysg.releasetime > 0 { blockevent(mysg.releasetime-t0, 2) } mysg.c = nil releaseSudog(mysg) if closed { if c.closed == 0 { throw("chansend: spurious wakeup") } panic(plainError("send on closed channel")) } return true } -
func chanrecv(c *hchan, ep unsafe.Pointer, block bool) (selected, received bool) {}
⚠️值得注意:
-
关闭 channel 时,会将 recvq 和 sendq 中的等待 goroutine 唤醒,由 GMP 调度器负责调度等待的 goroutine。从关闭的 goroutine 中读取数据时,如果 channel 缓冲区中仍有数据,将获取到缓冲区中的数据,如果 channel 缓冲区为空,将得到零值,需要注意的是,即使此时原来仍有阻塞的发送者,并不能获取到这次发送的消息,如下代码所示。
func goroutineExample() {
	println("goroutine example")
	ch := make(chan int)
	go func() {
		ch <- 1
	}()
	time.Sleep(1000)
	close(ch)
	v := <-ch
	println("read ch: ", v) // v is 0 not 1
}
向关闭的 channel 中发送消息,将导致 panic。
-
向 nil 的 channel 中发送数据将导致 goroutine 永久阻塞,而不是 panic!!!
func TestChannel(t *testing.T) {
	t.Log("block channel forever!!!")
	var blockCh chan interface{}
	blockCh <- struct{}{}
}
Go Sync
Pool
通过 Put() / Get() 管理缓存对象,使用 New() 生成默认缓存对象,从而减少 GC 压力,数据结构方面涉及 Dequeue、RingBuffer 等方面,难点涉及 P 的 LocalPool、Pin 等关于调度器内存结构及调度器抢占等内容。
下面是 Gin 中的实践:
// ServeHTTP conforms to the http.Handler interface.
func (engine *Engine) ServeHTTP(w http.ResponseWriter, req *http.Request) {
	c := engine.pool.Get().(*Context) // get
	c.writermem.reset(w)
	c.Request = req
	c.reset() // clean !!!

	engine.handleHTTPRequest(c)

	engine.pool.Put(c) // put
}
在实现上,调用 Put 和 Get 前,先调用 pin( ) 方法锁定当前的 goroutine,使其不能被抢占,然后将变量添加到 PoolChain 链表中,或从链表中获取对应的缓存对象。最后调用 runtime_procUnpin( ) 接触锁定。
Mutex & RWMutex
Golang sync.Mutex分析
Mutex 通过 Lock() 和 UnLock() 两个方法实现并发原语,Mutex 的结构为包括 state 和 sema 两个变量。
type Mutex struct {
 state int32
 sema  uint32
}
在加锁和解锁的主要对 state 变量进行操作,state 变量结构如下。
mutexLocked = 1 << iota // mutex is locked 1 表示锁已经被占用
mutexWoken // 1 表示目前有唤醒的协程正在竞争锁,不需要再唤醒等待的协程
mutexStarving // 1 表示当前的锁处于饥饿状态
mutexWaiterShift = iota // 3,占3 至 31 位,代表等待该锁的 goroutine 数量,
Lock( ) 过程如下,首先通过 CAS 快速判断是否能够获取得到锁,如果失败则通过 m.lockSlow( ) 方法通过自旋和信号量等方式获取得到锁。在 lockSlow( ) 方法中涉及 wake 变量及饥饿模型等锁的设计。
func (m *Mutex) Lock() {
	// Fast path: grab unlocked mutex.
	if atomic.CompareAndSwapInt32(&m.state, 0, mutexLocked) {
		if race.Enabled {
			race.Acquire(unsafe.Pointer(m))
		}
		return
	}
	// Slow path (outlined so that the fast path can be inlined)
	m.lockSlow()
}
UnLock( ) 方法与 Lock( ) 方法类似,
func (m *Mutex) Unlock() {
	if race.Enabled {
		_ = m.state
		race.Release(unsafe.Pointer(m))
	}

	// Fast path: drop lock bit.
	new := atomic.AddInt32(&m.state, -mutexLocked)
	if new != 0 {
		// Outlined slow path to allow inlining the fast path.
		// To hide unlockSlow during tracing we skip one extra frame when tracing GoUnblock.
		m.unlockSlow(new)
	}
}
Cond
Golang sync.Cond 条件变量源码分析
通过调用 Wait( ) / Signal( ) / Broadcast( ) 等方法来实现 goroutine 等待某一事件发生的并发同步。
cd := sync.NewCond(&sync.Mutex{})
for range []int{1, 2, 3} {
	go func() {
		cd.L.Lock()
		cd.Wait()
		cd.L.Unlock()
		println("go")
	}()
}
time.Sleep(1e6)

cd.L.Lock()
println("signal")
cd.Signal()
cd.L.Unlock()
time.Sleep(1e6)

println("broadcast")
cd.L.Lock()
cd.Broadcast()
cd.L.Unlock()
time.Sleep(1e6)
Wait( ) 方法将当前 goroutine 添加到唤醒队列并解锁,然后让出 CPU 等待调度器的调度。Signal/Broadcast 方法会唤醒队列中的一个或全部等待协程。
Once
提供了只运行一次指定函数的保证。下面是实现逻辑:
func (o *Once) Do(f func()) {
 // Note: Here is an incorrect implementation of Do:
 //
 // if atomic.CompareAndSwapUint32(&o.done, 0, 1) {
 //  f()
 // }
 //
 // Do guarantees that when it returns, f has finished.
 // This implementation would not implement that guarantee:
 // given two simultaneous calls, the winner of the cas would
 // call f, and the second would return immediately, without
 // waiting for the first's call to f to complete.
 // This is why the slow path falls back to a mutex, and why
 // the atomic.StoreUint32 must be delayed until after f returns.

 if atomic.LoadUint32(&o.done) == 0 {
  // Outlined slow-path to allow inlining of the fast-path.
  o.doSlow(f)
 }
}

func (o *Once) doSlow(f func()) {
 o.m.Lock()
 defer o.m.Unlock()
 if o.done == 0 {
  defer atomic.StoreUint32(&o.done, 1)
  f()
 }
}
其中 comment 也指出,不能简单的通过 CAS 操作保证 f( ) 执行一次,因为 CAS 操作不能保证 f( ) 返回,两个线程同时进行 CAS 第二个线程可能在第一个线程 f( ) 调用未返回之前返回。而通过 mutex 能够保证所有线程都在 f( ) 完成一次且仅完成一次的情况下返回,在未返回之前阻塞。
WaitGroup
Golang WaitGroup 原理深度剖析
通过 Add() / Done() / Wait() 接口实现某线程等待其他多线程完成任务的并发同步。
主要结构体如下所示:
type WaitGroup struct {
 noCopy noCopy

 // 64-bit value: high 32 bits are counter, low 32 bits are waiter count.
 // 64-bit atomic operations require 64-bit alignment, but 32-bit
 // compilers only guarantee that 64-bit fields are 32-bit aligned.
 // For this reason on 32 bit architectures we need to check in state()
 // if state1 is aligned or not, and dynamically "swap" the field order if
 // needed.
 state1 uint64 // 高 32 位存储 counter 数目,低 32 位存储 waiter 数目。
 state2 uint32
}
其中 Done() 通过调用 Add(1) 实现
// Done decrements the WaitGroup counter by one.
func (wg *WaitGroup) Done() {
 wg.Add(-1)
}
Add() 主要逻辑如下:
func (wg *WaitGroup) Add(delta int) {
 statep, semap := wg.state()
 state := atomic.AddUint64(statep, uint64(delta)<<32)
 v := int32(state >> 32)
 w := uint32(state)
 // 如果 v(counter) 大于零并且 w(waiter) 等于零
 // 说明没有阻塞的 goroutine,此时直接返回
 if v > 0 || w == 0 {
   return
 }
 // counter 等于零此时,需要唤醒所有阻塞的 goroutine
 // Reset waiters count to 0.
 *statep = 0
  // 唤醒所有阻塞的 goroutine
 for ; w != 0; w-- {
  runtime_Semrelease(semap, false, 0)
 }
}
Wait() 逻辑如下:
func (wg *WaitGroup) Wait() {
 statep, semap := wg.state()
 for {
  state := atomic.LoadUint64(statep)
  v := int32(state >> 32)
  w := uint32(state)
  if v == 0 {
   // Counter is 0, no need to wait.
   return
  }
  // Increment waiters count.
  if atomic.CompareAndSwapUint64(statep, state, state+1) {
   runtime_Semacquire(semap)
   return
 	}
}
Map
sync.Map 利用 atomic.Value 字段来实现只读部分并发,通过 dirty 字段实现加锁写部分并发,从而提高 Map 的并发性能。Map 的数据结构如下所示:
type Map struct {
    mu sync.Mutex
    read atomic.Value
    dirty map[interface{}]*entry
    misses int
}
read 字段主要用于读取,dirty 字段主要用于写入,从而减少读写的锁竞争。misses 字段会记录从 read 读取时没有命中的次数,当 missed 为命中次数等于 dirty 的长度时,会将 dirty 提升为 read。
Map 的 Load() 实现逻辑如下,
- 首先获取 read 字段,从 read 中检索目标 key 是否存在,如果存在则直接返回。
- 当 key 不存在 read 中,且此时 amended 设置时,表明 dirty 中存在 read 中不存在的键值对。
- 首先对 read 进行二次检查,这是因为 missLocked 方法会将 dirty 提升为 read,如果上次加锁时进行了提升,那么这次加锁中的 read 字段就是最新的记录,不需要从 dirty 中检索。
- 反之,从 dirty 中检索键值对,并增加一次为命中纪录。
func (m *Map) loadReadOnly() readOnly {
	if p := m.read.Load(); p != nil {
		return *p
	}
	return readOnly{}
}

func (m *Map) Load(key any) (value any, ok bool) {
	read := m.loadReadOnly()
	e, ok := read.m[key]
	if !ok && read.amended {
		m.mu.Lock()
		// Avoid reporting a spurious miss if m.dirty got promoted while we were
		// blocked on m.mu. (If further loads of the same key will not miss, it's
		// not worth copying the dirty map for this key.)
		read = m.loadReadOnly()
		e, ok = read.m[key]
		if !ok && read.amended {
			e, ok = m.dirty[key]
			// Regardless of whether the entry was present, record a miss: this key
			// will take the slow path until the dirty map is promoted to the read
			// map.
			m.missLocked()
		}
		m.mu.Unlock()
	}
	if !ok {
		return nil, false
	}
	return e.load()
}
其中 Store() 的实现逻辑如下,
- 首先检索 read 中是否存在对应的 key,如果存在则通过 CAS 操作直接替换目标的值。
- 当 read 中不存在 key 时,通过加锁对 dirty 进行写,这里加锁用于避免并发中的写竞争。
- 第一个分支首先进行双重检查,与 Load( ) 中的逻辑相同,如果上一次锁竞争的胜者进行了 dirty 的提升,则本次加锁得到的 read 是更新过的,此时检查 read 即可获得键值对。其中第一个判断分支中的 e.unexpungeLocked( ) 标记表明 dirty 中不存在该键,需要在 dirty 中记录该键。
- 从 dirty 中检索 key 是否存在,如果存在简单的进行替换。
- 如果 dirty 中不存在,表明需要插入新的键,如果是第一次插入 dirty 此时先需要设置 read 为 amended,并为 dirty 分配空间。最后直接将键值对插入 dirty。
// Swap swaps the value for a key and returns the previous value if any.
// The loaded result reports whether the key was present.
func (m *Map) Swap(key, value any) (previous any, loaded bool) {
	read := m.loadReadOnly()
	if e, ok := read.m[key]; ok {
		if v, ok := e.trySwap(&value); ok {
			if v == nil {
				return nil, false
			}
			return *v, true
		}
	}

	m.mu.Lock()
	read = m.loadReadOnly()
	if e, ok := read.m[key]; ok {
		if e.unexpungeLocked() {
			// The entry was previously expunged, which implies that there is a
			// non-nil dirty map and this entry is not in it.
			m.dirty[key] = e
		}
		if v := e.swapLocked(&value); v != nil {
			loaded = true
			previous = *v
		}
	} else if e, ok := m.dirty[key]; ok {
		if v := e.swapLocked(&value); v != nil {
			loaded = true
			previous = *v
		}
	} else {
		if !read.amended {
			// We're adding the first new key to the dirty map.
			// Make sure it is allocated and mark the read-only map as incomplete.
			m.dirtyLocked()
			m.read.Store(&readOnly{m: read.m, amended: true})
		}
		m.dirty[key] = newEntry(value)
	}
	m.mu.Unlock()
	return previous, loaded
}
expunged 用于标识对应的 key 已经删除,由于在 read 中不能够并发的进行操作,因此通过 CAS 将 entry 中的 p 设置为 nil 来标识该键已经被删除,在 dirtyLocked( ) 方法中会检查 read 中的 entry 是否为 nil,如果为 nil 则标记为 expunged,不为 expunged 的键值对将复制到新的 dirty 中。而在 dirty 中,由于用 lock 加锁可以直接调用内置的 delete 关键字删除对应的键。
func (m *Map) dirtyLocked() {
	if m.dirty != nil {
		return
	}

	read := m.loadReadOnly()
	m.dirty = make(map[any]*entry, len(read.m))
	for k, e := range read.m {
		if !e.tryExpungeLocked() {
			m.dirty[k] = e
		}
	}
}

// LoadAndDelete deletes the value for a key, returning the previous value if any.
// The loaded result reports whether the key was present.
func (m *Map) LoadAndDelete(key any) (value any, loaded bool) {
	read := m.loadReadOnly()
	e, ok := read.m[key]
	if !ok && read.amended {
		m.mu.Lock()
		read = m.loadReadOnly()
		e, ok = read.m[key]
		if !ok && read.amended {
			e, ok = m.dirty[key]
			delete(m.dirty, key)
			// Regardless of whether the entry was present, record a miss: this key
			// will take the slow path until the dirty map is promoted to the read
			// map.
			m.missLocked()
		}
		m.mu.Unlock()
	}
	if ok {
		return e.delete()
	}
	return nil, false
}

func (e *entry) delete() (value any, ok bool) {
	for {
		p := e.p.Load()
		if p == nil || p == expunged {
			return nil, false
		}
		if e.p.CompareAndSwap(p, nil) {
			return *p, true
		}
	}
}
- Atomic 分析补充
Context & 定时器
Context
Context 接口如下,
type Context interface {
	Deadline() (deadline time.Time, ok bool)
	Done() <-chan struct{}
	Err() error
	Value(key any) any
}
Context 实现 goroutine 之间的变量传递与信号共享,context.Background 与 context.Todo 都将返回内部结构体 emptyContext 变量,emptyContext 实现了 Context 接口的所有方法,但是所有方法都没有任何功能。background 作为所有 context 的上级,而 todo 作为不确定时的占位符。
var (
	background = new(emptyCtx)
	todo       = new(emptyCtx)
)

func Background() Context {
	return background
}

func TODO() Context {
	return todo
}
context.Cancel 提供一个 cancelFunc( ) 用于同步各 goroutine 的取消信号,结合 Done( ) 方法,各个 goroutine 通过监听 Done 返回的 channel,当发现 channel 关闭时,执行取消当前任务的命令实现各 goroutine 之间的停止动作的同步 。context.WithCancel( ) 将调用内部实现 withCancel,其代码如下:
func WithCancel(parent Context) (ctx Context, cancel CancelFunc) {
	c := withCancel(parent)
	return c, func() { c.cancel(true, Canceled, nil) }
}

func withCancel(parent Context) *cancelCtx {
	if parent == nil {
		panic("cannot create context from nil parent")
	}
	c := newCancelCtx(parent)
	propagateCancel(parent, c)
	return c
}
首先在 newCancelCtx( ) 方法中创建新的 cancelCtx,其基本结构如下,
type cancelCtx struct {
	Context

	mu       sync.Mutex            // protects following fields
	done     atomic.Value          // of chan struct{}, created lazily, closed by first cancel call
	children map[canceler]struct{} // set to nil by the first cancel call
	err      error                 // set to non-nil by the first cancel call
	cause    error                 // set to non-nil by the first cancel call
}
在 propagateCancel( ) 方法中,如果 parent 是不可取消的 context,如 background,则直接返回,不需要构建 context 之间的取消关系。
done := parent.Done()
if done == nil {
  return // parent is never canceled
}
如若 parent 是可取消的 context,接着会调用 Done( ) 方法判断上级 context 是否发送了取消同步信号,如果已经取消,则会调用 cancel 方法取消当前的 context
select {
  case <-done:
  // parent is already canceled
  child.cancel(false, parent.Err(), Cause(parent))
  return
  default:
}
如果取消信号未发送,则会检查 parent 是否是 cancelCtx 并转换为 $*cancelCtx$,首先进行双重检查,判断 p 是否已经取消( err 不为空),如果已经取消则调用 child.cancel( ) 同步取消,否则将当前 cancelCtx 添加到 p 中的 children 中。
if p, ok := parentCancelCtx(parent); ok {
  p.mu.Lock()
  if p.err != nil {
    // parent has already been canceled
    child.cancel(false, p.err, p.cause)
  } else {
    if p.children == nil {
      p.children = make(map[canceler]struct{})
    }
    p.children[child] = struct{}{}
  }
  p.mu.Unlock()
}
如果 parent 不是 cancelCtx,则将创建一个新的 goroutine 并监听 parent 是否同步取消。
go func() {
  select {
    case <-parent.Done():
    child.cancel(false, parent.Err(), Cause(parent))
    case <-child.Done():
    }
}()
通过 context.WithDeadline( )/WithTimeout( ) 可以获得定时取消的 cancelCtx( ), WithTimeout 是通过调用 withDeadline 方法实现的。而 withDeadline 实际上是借助 timer 和 cancelCtx 实现的。
首先 WithDeadline 会调用 Deadline( ) 方法判断 parent 是否的定时日期是否比当前设置的日期更早,如果更早则没必要设置更多的定时取消。
if cur, ok := parent.Deadline(); ok && cur.Before(d) {
  // The current deadline is already sooner than the new one.
  return WithCancel(parent)
}
正常情况下,会创建一个 cancelCtx 同时调用 time.AfterFunc( ) 在定时器触发的时候同步取消信号。
c := &timerCtx{
  cancelCtx: newCancelCtx(parent),
  deadline:  d,
}
propagateCancel(parent, c)
dur := time.Until(d)
if dur <= 0 {
  c.cancel(true, DeadlineExceeded, nil) // deadline has already passed
  return c, func() { c.cancel(false, Canceled, nil) }
}
c.mu.Lock()
defer c.mu.Unlock()
if c.err == nil {
  c.timer = time.AfterFunc(dur, func() {
    c.cancel(true, DeadlineExceeded, nil)
  })
}
return c, func() { c.cancel(true, Canceled, nil) }
Timer
- Todo
Go内部实现机制
GMP 调度器
-
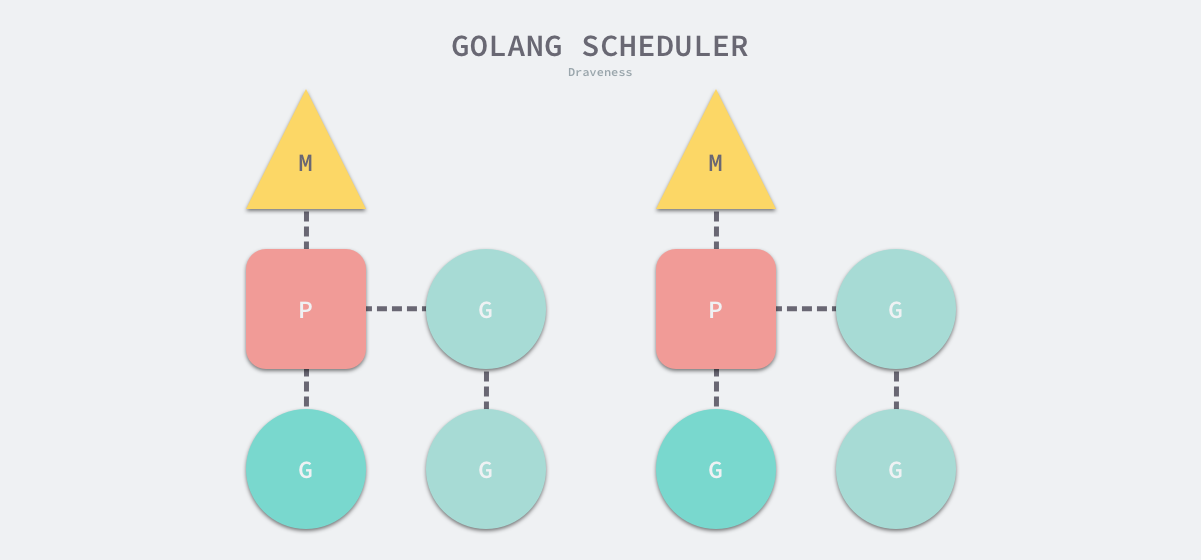
G 是指 Goroutine,M 是指线程,P 是指处理器。处理器连接一个线程和若干协程,负责协程的调度。通过调度器,使协程的调度发生在用户态,对比操作系统对线程的调度,降低了切换内核态和线程上下文的开销。
初始化,GMP 调度器会在程序启动时通过 schedinit 方法进行初始化,其中主要流程为确定最大处理器数量 procs,如果没有特殊指定环境变量,procs 默认为 CPU 核数量,即每个 CPU 绑定一个活跃线程,每个活跃线程绑定一个处理器。(注意,最大线程数并非最大处理数)
	procs := ncpu
	if n, ok := atoi32(gogetenv("GOMAXPROCS")); ok && n > 0 {
		procs = n
	}
	if procresize(procs) != nil {
		throw("unknown runnable goroutine during bootstrap")
	}
procresize 主要流程
- 首先由第 22 行至 61 行代码初始化 P 处理器,使其数量达到 nprocs 指定的数量,
- 接下来第 88 行代码绑定一个处理器至线程,
- 第 119 行代码将其余处理器设置为 idle 状态。
这样就完成了调度器的初始化,使处理器数量为 procs,并将其中一个活跃线程绑定一个处理器 P。
func procresize(nprocs int32) *p {
	assertLockHeld(&sched.lock)
	assertWorldStopped()

	old := gomaxprocs
	if old < 0 || nprocs <= 0 {
		throw("procresize: invalid arg")
	}
	if trace.enabled {
		traceGomaxprocs(nprocs)
	}

	// update statistics
	now := nanotime()
	if sched.procresizetime != 0 {
		sched.totaltime += int64(old) * (now - sched.procresizetime)
	}
	sched.procresizetime = now

	maskWords := (nprocs + 31) / 32

	// Grow allp if necessary.
	if nprocs > int32(len(allp)) {
		// Synchronize with retake, which could be running
		// concurrently since it doesn't run on a P.
		lock(&allpLock)
		if nprocs <= int32(cap(allp)) {
			allp = allp[:nprocs]
		} else {
			nallp := make([]*p, nprocs)
			// Copy everything up to allp's cap so we
			// never lose old allocated Ps.
			copy(nallp, allp[:cap(allp)])
			allp = nallp
		}

		if maskWords <= int32(cap(idlepMask)) {
			idlepMask = idlepMask[:maskWords]
			timerpMask = timerpMask[:maskWords]
		} else {
			nidlepMask := make([]uint32, maskWords)
			// No need to copy beyond len, old Ps are irrelevant.
			copy(nidlepMask, idlepMask)
			idlepMask = nidlepMask

			ntimerpMask := make([]uint32, maskWords)
			copy(ntimerpMask, timerpMask)
			timerpMask = ntimerpMask
		}
		unlock(&allpLock)
	}

	// initialize new P's
	for i := old; i < nprocs; i++ {
		pp := allp[i]
		if pp == nil {
			pp = new(p)
		}
		pp.init(i)
		atomicstorep(unsafe.Pointer(&allp[i]), unsafe.Pointer(pp))
	}

	gp := getg()
	if gp.m.p != 0 && gp.m.p.ptr().id < nprocs {
		// continue to use the current P
		gp.m.p.ptr().status = _Prunning
		gp.m.p.ptr().mcache.prepareForSweep()
	} else {
		// release the current P and acquire allp[0].
		//
		// We must do this before destroying our current P
		// because p.destroy itself has write barriers, so we
		// need to do that from a valid P.
		if gp.m.p != 0 {
			if trace.enabled {
				// Pretend that we were descheduled
				// and then scheduled again to keep
				// the trace sane.
				traceGoSched()
				traceProcStop(gp.m.p.ptr())
			}
			gp.m.p.ptr().m = 0
		}
		gp.m.p = 0
		pp := allp[0]
		pp.m = 0
		pp.status = _Pidle
		acquirep(pp)
		if trace.enabled {
			traceGoStart()
		}
	}

	// g.m.p is now set, so we no longer need mcache0 for bootstrapping.
	mcache0 = nil

	// release resources from unused P's
	for i := nprocs; i < old; i++ {
		pp := allp[i]
		pp.destroy()
		// can't free P itself because it can be referenced by an M in syscall
	}

	// Trim allp.
	if int32(len(allp)) != nprocs {
		lock(&allpLock)
		allp = allp[:nprocs]
		idlepMask = idlepMask[:maskWords]
		timerpMask = timerpMask[:maskWords]
		unlock(&allpLock)
	}

	var runnablePs *p
	for i := nprocs - 1; i >= 0; i-- {
		pp := allp[i]
		if gp.m.p.ptr() == pp {
			continue
		}
		pp.status = _Pidle
		if runqempty(pp) {
			pidleput(pp, now)
		} else {
			pp.m.set(mget())
			pp.link.set(runnablePs)
			runnablePs = pp
		}
	}
	stealOrder.reset(uint32(nprocs))
	var int32p *int32 = &gomaxprocs // make compiler check that gomaxprocs is an int32
	atomic.Store((*uint32)(unsafe.Pointer(int32p)), uint32(nprocs))
	if old != nprocs {
		// Notify the limiter that the amount of procs has changed.
		gcCPULimiter.resetCapacity(now, nprocs)
	}
	return runnablePs
}
调度循环,完成调度器的初始化后,后续对 goroutine 的调度都将借助 schedule 函数进行调度。调度循环基本流程如下图所示,首先进入 schedule 函数,该方法将找到一个合适的 goroutine,接着通过 execute 函数调用 gogo 汇编代码去执行对应的 goroutine,当 goroutine 退出时,将调用 schedule 进入下一轮循环。
简单的调度循环流程如上所述,但是在系统调用、协作式抢占调度等场景下,也会出发 schedule 函数进行调度。因此 Go 语言中的调度器触发是非常复杂的一个过程。

schedule 函数的基本流程是:
- 第 10 行代码判断当前的线程 m 是否有锁定的协程 g,如果有则会将当前线程 m 的处理器 p 解绑,并将当前线程 m 阻塞,直到另一个线程的重新调度当前锁定的协程 g 为止。
- 第 32 行代码通过
findRunnable函数获取一个可以执行的协程 g - 第 41-56 行代码判断当前协程是否允许调度,如果不允许调度则放回
disable.runnable队列,直至允许调度。 - 第 60 行代码判断
findRunnable返回的协程 g 是否为系统协程(如 GC),如果是系统协程,则需要尝试唤醒另一个处理器 P 执行协程 g 。 - 第 63 行代码判断对应的协程 g 是否已经有锁定的线程 m,如果有,则需要唤醒原对应的线程,并使当前调度线程进入阻塞,该阻塞的线程等待唤醒后重新绑定处理器 P 并重新进入调度。
- 如果上述 3、4、5 均不满足,说明该协程是普通的协程,调用
execute函数执行对应的协程。
// One round of scheduler: find a runnable goroutine and execute it.
// Never returns.
func schedule() {
	mp := getg().m

	if mp.locks != 0 {
		throw("schedule: holding locks")
	}

	if mp.lockedg != 0 {
		stoplockedm()
		execute(mp.lockedg.ptr(), false) // Never returns.
	}

	// We should not schedule away from a g that is executing a cgo call,
	// since the cgo call is using the m's g0 stack.
	if mp.incgo {
		throw("schedule: in cgo")
	}

top:
	pp := mp.p.ptr()
	pp.preempt = false

	// Safety check: if we are spinning, the run queue should be empty.
	// Check this before calling checkTimers, as that might call
	// goready to put a ready goroutine on the local run queue.
	if mp.spinning && (pp.runnext != 0 || pp.runqhead != pp.runqtail) {
		throw("schedule: spinning with local work")
	}

	gp, inheritTime, tryWakeP := findRunnable() // blocks until work is available

	// This thread is going to run a goroutine and is not spinning anymore,
	// so if it was marked as spinning we need to reset it now and potentially
	// start a new spinning M.
	if mp.spinning {
		resetspinning()
	}

	if sched.disable.user && !schedEnabled(gp) {
		// Scheduling of this goroutine is disabled. Put it on
		// the list of pending runnable goroutines for when we
		// re-enable user scheduling and look again.
		lock(&sched.lock)
		if schedEnabled(gp) {
			// Something re-enabled scheduling while we
			// were acquiring the lock.
			unlock(&sched.lock)
		} else {
			sched.disable.runnable.pushBack(gp)
			sched.disable.n++
			unlock(&sched.lock)
			goto top
		}
	}

	// If about to schedule a not-normal goroutine (a GCworker or tracereader),
	// wake a P if there is one.
	if tryWakeP {
		wakep()
	}
	if gp.lockedm != 0 {
		// Hands off own p to the locked m,
		// then blocks waiting for a new p.
		startlockedm(gp)
		goto top
	}

	execute(gp, inheritTime)
}
调度触发,除线程启动的入口 mstart 函数后调度循环中的 goexit 函数会调用 schedule 外,系统调用、主动挂起协程、协作式抢占调度及系统监控等场景都会触发调度。
- 系统调用
- 补充完善调用触发的分析
网络轮询器
- Go 语言中的网络轮询器利用了操作系统的 IO 多路复用,为网络 IO、文件 IO、定时器等提供 IO 多路复用的能力。
- IO 多路复用包括 select/poll/epoll 等,其中 epoll 为 linux 系统专用 IO 多路复用,其性能相比 select/poll 有显著的提升。因为内核保存了 epoll 的文件描述符,不需要在每次调用时,将文件描述符复制到内核空间。
- 由于网络轮询器的存在,协程中存在 IO 阻塞时,协程将进入阻塞状态,但是此时处理器 P 将绑定新的协程,使得处理器 P 对应的线程不至阻塞,当网络轮询器发现对应的 IO 事件就绪时,将原阻塞协程加入运行队列中,使得原协程在未来某一时刻恢复运行状态。因此在 Go 语言中,不需要显式实现 IO 多路复用功能。
系统监控
内存分配器
垃圾收集器
GC 算法
GC(Garbage Collection) 算法用于回收内存中没用引用可以到达的垃圾对象。
栈内存管理
标准库
Go container
List
是一个双向链表。使用 List 结构体存储头节点和链表长度。
// List represents a doubly linked list.
// The zero value for List is an empty list ready to use.
type List struct {
 root Element // sentinel list element, only &root, root.prev, and root.next are used
 len  int     // current list length excluding (this) sentinel element
}
节点为 Element 元素。包括前后指针,和指向所属的 list 的指针,使用 any 存储任意值。
// Element is an element of a linked list.
type Element struct {
 // Next and previous pointers in the doubly-linked list of elements.
 // To simplify the implementation, internally a list l is implemented
 // as a ring, such that &l.root is both the next element of the last
 // list element (l.Back()) and the previous element of the first list
 // element (l.Front()).
 next, prev *Element

 // The list to which this element belongs.
 list *List

 // The value stored with this element.
 Value any
}
内部实现 insert() / remove() / move() 等基本 API 操作,衍生出暴露的诸如 InsertBefore() 等 API。
insert() 实现如下,首先确定插入节点 e 的前后指针,接着更新 e 的前后节点的 next 和 prev 指针。此外赋值所属 list 指针和增加 list 表示长度。
// insert inserts e after at, increments l.len, and returns e.
func (l *List) insert(e, at *Element) *Element {
 e.prev = at
 e.next = at.next
 e.prev.next = e
 e.next.prev = e
 e.list = l
 l.len++
 return e
}
remove() 实现如下,更新前后节点的 next 和 prev 指针,然后释放当前节点的引用。
// remove removes e from its list, decrements l.len
func (l *List) remove(e *Element) {
 e.prev.next = e.next
 e.next.prev = e.prev
 e.next = nil // avoid memory leaks
 e.prev = nil // avoid memory leaks
 e.list = nil
 l.len--
}
move() 的实现如下,首先判断是否需要移动,接着更新当前节点的前后节点指针,进行删除,最后更新插入位置的指针和插入位置前后节点的指针。
// move moves e to next to at.
func (l *List) move(e, at *Element) {
 if e == at {
  return
 }
 e.prev.next = e.next
 e.next.prev = e.prev

 e.prev = at
 e.next = at.next
 e.prev.next = e
 e.next.prev = e
}
Ring
是一个环形链表。环中的每一个元素由 Ring 构成。Ring 的组成如下。
// A Ring is an element of a circular list, or ring.
// Rings do not have a beginning or end; a pointer to any ring element
// serves as reference to the entire ring. Empty rings are represented
// as nil Ring pointers. The zero value for a Ring is a one-element
// ring with a nil Value.
type Ring struct {
 next, prev *Ring
 Value      any // for use by client; untouched by this library
}
Ring 主要包括三类操作,1)、New() / Link() / Unlink() 等初始化及链接和断开环的操作。2)、Next() / Prev() / Move() 等移动节点的操作。3)、Do() 遍历环中节点的操作。
New() 用来初始化环,New() 主要逻辑如下,首先判断长度是否大于零,然后初始化一个 Ring 指针,然后根据长度增加节点,最后链接头尾节点。
// New creates a ring of n elements.
func New(n int) *Ring {
 if n <= 0 {
  return nil
 }
 r := new(Ring)
 p := r
 for i := 1; i < n; i++ {
  p.next = &Ring{prev: p}
  p = p.next
 }
 p.next = r
 r.prev = p
 return r
}
Link() 用于链接两个环,Link() 的实现如下,源码中强调了不能使用多重赋值,是因为多重赋值是不能保证赋值顺序的,而这里我们需要强调赋值的顺序。
首先获取当前节点 r 的下一个节点及目标节点 s 的最后一个节点,在节点 s 的头部进行链接,即 r.next = s 和 s.prev = r,接着在节点 s 的尾部进行链接,即 p.next() = n 和 n.prev = p。
如果 r 和 s 是同一个环中的节点,那么 r 和 s 中间的节点将会移除,r 和 s 链接在一起,剩下的部分链接在一起。
func (r *Ring) Link(s *Ring) *Ring {
 n := r.Next()
 if s != nil {
  p := s.Prev()
  // Note: Cannot use multiple assignment because
  // evaluation order of LHS is not specified.
  r.next = s
  s.prev = r
  n.prev = p
  p.next = n
 }
 return n
}
Next() / Move() / Prev() 逻辑相近,其实现如下。
其中 if r.next == nil 的判断可能是用户自己初始化的 Ring 结构体没有成环的检查 🤔️。
// Next returns the next ring element. r must not be empty.
func (r *Ring) Next() *Ring {
 if r.next == nil {
  return r.init()
 }
 return r.next
}

// Prev returns the previous ring element. r must not be empty.
func (r *Ring) Prev() *Ring {
 if r.next == nil {
  return r.init()
 }
 return r.prev
}

// Move moves n % r.Len() elements backward (n < 0) or forward (n >= 0)
// in the ring and returns that ring element. r must not be empty.
func (r *Ring) Move(n int) *Ring {
 if r.next == nil {
  return r.init()
 }
 switch {
 case n < 0:
  for ; n < 0; n++ {
   r = r.prev
  }
 case n > 0:
  for ; n > 0; n-- {
   r = r.next
  }
 }
 return r
}
Do() 函数逻辑即遍历环,并对每个节点应用 f()。这种设计模式有一定的局限,如果 Do 能够传入可变参数列表,并将可变参数列表传入 f 中,这样可以将外部变量代入处理函数 f 中,这样在某些统计函数时带来便利性,如 Do(f(len), len) 这种模式。
// Do calls function f on each element of the ring, in forward order.
// The behavior of Do is undefined if f changes *r.
func (r *Ring) Do(f func(any)) {
 if r != nil {
  f(r.Value)
  for p := r.Next(); p != r; p = p.next {
   f(p.Value)
  }
 }
}
相比于 List 的双向链表,Ring 是有限制的双向链表,Ring 有以下特点。
- 无法在 O(1) 时间复杂度内确定环的长度。
- 不能直接调用 Insert、Remove 等传统链表操作。
Heap
container/heap
实现了堆的数据结构,这里采用 interface 的模式描述堆的特性,并不直接实现堆的容器。
type Interface interface {
 sort.Interface
 Push(x any) // add x as element Len()
 Pop() any   // remove and return element Len() - 1.
}

type Interface interface {
	Len() int
	Less(i, j int) bool
	Swap(i, j int)
}
Heap 的核心方法为 up() / down(),在《算法》一书中为 swim() / sink(),意为上浮和下沉。
up() 的实现如下,首先 i := (j - 1) / 2 找到对应节点的父节点,这里是从 0 开始计算节点,接着判断节点是否为堆顶,判断是否需要进行交换,不满足条件退出循环,否则,交换父节点于子节点,并对父节点迭代操作。
func up(h Interface, j int) {
 for {
  i := (j - 1) / 2 // parent
  if i == j || !h.Less(j, i) {
   break
  }
  h.Swap(i, j)
  j = i
 }
}
down() 的实现如下,首先用 $j1 := 2*i + 1$ 计算对应子节点的索引,这里从 0 开始计算节点,并判断该索引是否超出长度 n,此外源码这里考虑到了可能溢出的问题,判断 j1 < 0。
接着判断子节点中左节点和右节点的大小,选取更小者,最后判断更小者与父节点的大小关系,如果不满足交换则退出,否则交换子节点和父节点,并对子节点进行迭代。
最后返回结果时,根据初始索引和最后的索引值判断是否能够下沉。
func down(h Interface, i0, n int) bool {
 i := i0
 for {
  j1 := 2*i + 1
  if j1 >= n || j1 < 0 { // j1 < 0 after int overflow
   break
  }
  j := j1 // left child
  if j2 := j1 + 1; j2 < n && h.Less(j2, j1) {
   j = j2 // = 2*i + 2  // right child
  }
  if !h.Less(j, i) {
   break
  }
  h.Swap(i, j)
  i = j
 }
 return i > i0
}
Heap 根据 up() / down() 方法实现了其他暴露出来的 API。
Init() 方法对堆进行初始化,Push() / Pop() 方法分别实现向堆中有序加入元素和弹出堆顶的操作,这两个操作依赖于 Interface 中实现的 Push 和 Pop。Remove() 方法将目标索引替换至队尾并重新有序化堆,最后调用 interface 中的 Pop 实现删除目标索引的元素。Fix() 方法用于堆指定元素重新有序化,这可以运用于直接修改堆中指定索引的元素后,调用 Fix 方法保证堆的有序化。
func Init(h Interface) {
 // heapify
 n := h.Len()
 for i := n/2 - 1; i >= 0; i-- {
  down(h, i, n)
 }
}

func Push(h Interface, x any) {
	h.Push(x)
	up(h, h.Len()-1)
}

func Pop(h Interface) any {
	n := h.Len() - 1
	h.Swap(0, n)
	down(h, 0, n)
	return h.Pop()
}

func Remove(h Interface, i int) any {
	n := h.Len() - 1
	if n != i {
		h.Swap(i, n)
		if !down(h, i, n) {
			up(h, i)
		}
	}
	return h.Pop()
}

func Fix(h Interface, i int) {
	if !down(h, i, h.Len()) {
		up(h, i)
	}
}
net/http
常用库
panjf2000/ants
ants 是一个 golang 语言中的协程池工具。